de Solountip.com!
Cómo hacer faros marinos con macetas para plantas.
Páginas
Etiquetas
Búsqueda rápida en el blog
Mostrando entradas con la etiqueta Manualidades. Mostrar todas las entradas
miércoles, 8 de octubre de 2014
domingo, 19 de agosto de 2012
jueves, 9 de agosto de 2012
lunes, 9 de julio de 2012
para el bolso de la playa
domingo, 8 de julio de 2012
Cestos de plastico de bolsas
¿para macetas?
Visto en http://luckyladybirdcraft.blogspot.com.es/2009/03/over-past-few-weeks-me-and-my-friend.html
domingo, 1 de julio de 2012
Collares de hielo
Choose to wear them against bare skin...with lots of squealing, or over your shirt for a cool, steady soak.
Visto en http://mayamade.blogspot.com/
sábado, 30 de junio de 2012
Camiseta con flores (o firework)
Camiseta con bailarina
miércoles, 27 de junio de 2012
kids crafts
e-books de manualidades
http://www.favecrafts.com/Crafting-with-Kids/Family-Fun-Crafts-16-Craft-Ideas-for-Kids-eBook
http://www.favecrafts.com/Crafting-with-Kids/Summer-Crafts-for-Kids-eBook
http://www.favecrafts.com/Crafting-with-Kids/Family-Fun-Crafts-16-Craft-Ideas-for-Kids-eBook
http://www.favecrafts.com/Crafting-with-Kids/Summer-Crafts-for-Kids-eBook
lunes, 18 de junio de 2012
Teñido a rombos: cruz y rombo
For this X, I folded the shirt in quarters, then accordion pleated
diagonally from the center to the outer corners. I used the
full-strength dyes in sections on one edge of the pleats, and the
diluted dyes in the same sections on the edges of the other side.
That's what gives it the dark-light-dark effect, which is especially
noticeable in the turquoise stripes.
It's
hard to see in these photos, but the dyes spread differently on the
cotton than they did on the cotton/poly. Remember that I applied the
dye to dry, washed t-shirts. On the cotton, the dye tended to stop
spreading and not blend quite so much. On the cotton/poly, the dyes
tended to spread out more and blend more, giving a more "smeared" effect
as seen in the diamond shirt below. Close up, the cotton/poly also has
a more "heathered" appearance because the white polyester fibers don't
pick up the dye. This diamond shirt is the one cotton/poly shirt that I
did not wash before dyeing.

The diamond pattern is folded the same way as the X, except the pleats are folded on the other diagonal, from the underarm to the neck.
Visto en http://blog.amethistle.com/2008/02/review-of-tulip-tie-dye-kit.html
Y otros rombos? (ikat dyeing)
The diamond pattern is folded the same way as the X, except the pleats are folded on the other diagonal, from the underarm to the neck.
Visto en http://blog.amethistle.com/2008/02/review-of-tulip-tie-dye-kit.html
Y otros rombos? (ikat dyeing)
Teñido a nudos; signo hippy
Visto en http://www.howtotiedye.net/tiedyepatterns/camouflagepeacesigntiedyetshirt/
Otro tutorial http://allthingscharming.wordpress.com/2012/04/25/tie-dyed-peace-sign/
Teñido a nudos: corazón
Michael
Fowler's "Tie Dye Heart Pattern" instructions:
"1. Lay your prewashed blank apparel or fabric flat on a table.

"2. Wet the fabric until it is uniformly damp (spray bottle), but not dripping. Then, fold the fabric in half- down the middle of the fabric (as shown above). This step is similar to a heart cutout on paper.

"3. Create a heart template on cardboard/posterboard or draw a freehand half-heart. Use a fabric marker or heat-transfer pencil to temporarily markup the fabric.


[end of quote from Michael Fowler's "Tie Dye Heart Pattern" instructions]
Visto en http://www.pburch.net/dyeing/dyeblog/C1056414315/E20060502093756/
"1. Lay your prewashed blank apparel or fabric flat on a table.

"2. Wet the fabric until it is uniformly damp (spray bottle), but not dripping. Then, fold the fabric in half- down the middle of the fabric (as shown above). This step is similar to a heart cutout on paper.

"3. Create a heart template on cardboard/posterboard or draw a freehand half-heart. Use a fabric marker or heat-transfer pencil to temporarily markup the fabric.

"4. Accordion fold the fabric along the drawn heart-shape line, forcing it
into a straight
line.

"Note: Often hearts are made by stitching the shape and resist dyeing, the heart shape is created by the undyed, resisted areas. These illustrations detail how to fold a heart and the technique will also transfer to many other popular shapes.

"5. Once the arc of the curve is forced into a straight line, the fold becomes a straight accordion fold.


"6. Your accordion folded line should now reflect a small straight line (shown directly above).

"7. View the small portion above. Dye placed in the small area will create the dyed shape of the heart.

"8. Use cotton string to tie along the drawn line. To create a color ring (band) around the heart, tie an additional parallel band. (optional)

"To dye the heart, place a dye color in the smaller area next to the tied
cotton string (or rubberband) and use your hands to squeeze/blend a solid color
w/ little or no white areas. The heart looks great with or without a color band
(parallel line of color placed on the outside of the heart line) to define the
shape.
"The outside fabric color (bleed area) also defines the heart shape and you
will also get a resist from the tied string that creates an outline of the
heart. For further details on applying dye colors, view Michael Fowler's Art of Tie-Dye DVD. "

[end of quote from Michael Fowler's "Tie Dye Heart Pattern" instructions]
Visto en http://www.pburch.net/dyeing/dyeblog/C1056414315/E20060502093756/
miércoles, 13 de junio de 2012
Teñido a nudos
swirl tie dye
![]() |
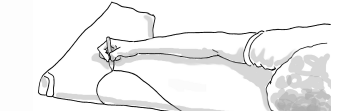
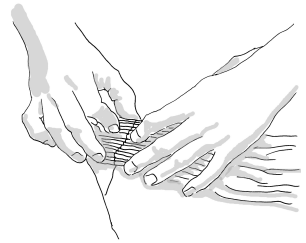
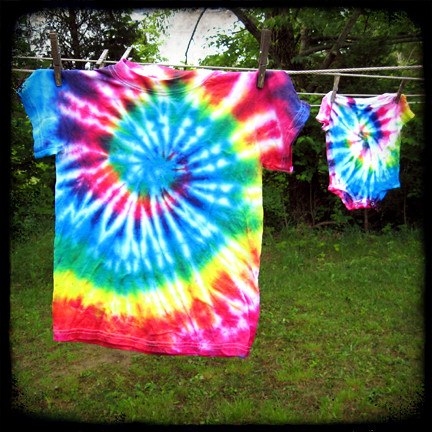
Pinch and twist Before beginning, read the Tie-Dye how-to instructions and refer back to them for standard steps. Prewash fabric to remove sizing. Do not use fabric softener or dryer sheets. Cover work surface with a plastic tablecloth. Lay fabric flat on work surface. Decide the area on the fabric where you want the swirl to be. Pinch fabric at this point. Twist fabric around into a flat spiral. |
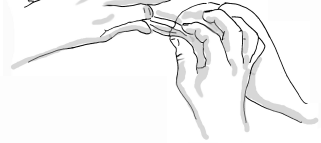
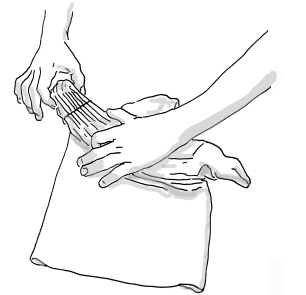
![]() |
Bind
Bind with rubber bands, creating 6 wedge shapes. Use more rubber bands as desired. |
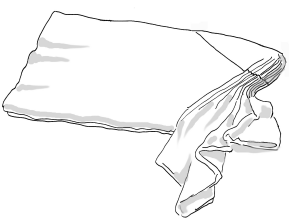
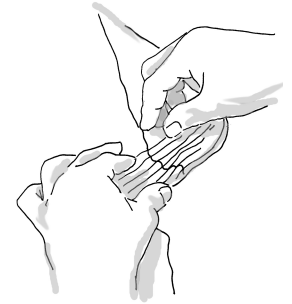
![]() |
Apply Dye
Apply Dye on wedges using as many colors as desired, in the desired arrangement – alternating wedges, connecting wedges, etc. or use a single color. Cover fabric with plastic. Let set 4 to 6 hours. Remove rubber bands. Fill washer to large load setting with hottest water suitable for fabric and a small amount of non-bleach laundry detergent. Wash and dry separately. |
Visto en http://www.favecrafts.com/Tie-Dye/Swirl-Tie-Dye-Technique-from-Tulip/ct/1
Visto en http://pinterest.com/pin/12877548904952920/
Mas detalles http://images.dharmatrading.com/images/public/instructional/tiedyeinstructions/tiedye_bw_pamphlet.pdf
viernes, 1 de junio de 2012
Flores de otoño
lunes, 14 de mayo de 2012
viernes, 4 de mayo de 2012
Piedras-colgantes

Visto en http://littleowlarts.blogspot.com.es/2011/10/treasures-from-catskills-of-new-york.html
domingo, 29 de abril de 2012
Muñequitas crochet
Visto en http://craftandcreativity.com/blog/2012/02/06/momsdolls/?utm_source=rss&utm_medium=rss&utm_campaign=momsdolls

———
I just have to show you these wonderful dolls that my mother crocheted. My daughters got one each for Christmas. They are not much taller than a match. My mom’s blog is called Annie’s Granny and the pattern for the dolls is free and comes from By Hook, By Hand.

Varje docka kom med en uppsättning klänningar och hattar (och en nalle). /
Each doll came with a collection of dresses and hats (and a teddy bear).

And their own cozy beds – with a mattress, a pillow and a blanket. Needless to say, the girls love their new dolls!
The patterns for the doll and clothing are located here and on the left sidebar (Visto en http://byhookbyhand.blogspot.com.es/2009/11/good-thing-come-in-small-packages.html):
Doll pattern: http://sites.google.com/site/designbybethann/home/links/FreeSpiritMiniDoll.pdf?attredirects=0&d=1
Nightgown: http://sites.google.com/site/designbybethann/home/links/FSMiniNightgown.pdf?attredirects=0&d=1
Underwear: http://sites.google.com/site/designbybethann/home/links/FSMiniPantaloons.pdf?attredirects=0&d=1
Dress and Sunsuit: http://sites.google.com/site/designbybethann/home/links/FSMiniSideToSideBodiceDress%26SunSuit.pdf?attredirects=0&d=1
Mohair Sweater: http://sites.google.com/site/designbybethann/home/links/FSMiniMohairSweater.pdf?attredirects=0&d=1
Below is Carina, in the dark braids, and Jenny, with the curly red hair. Carina is wearing a dress from the pattern that comes with the Cindy doll; made without any alterations :-) The Mini Free Spirit Doll pattern includes instructions for both hair styles below, plus several others that are very easy.

———
I just have to show you these wonderful dolls that my mother crocheted. My daughters got one each for Christmas. They are not much taller than a match. My mom’s blog is called Annie’s Granny and the pattern for the dolls is free and comes from By Hook, By Hand.

Varje docka kom med en uppsättning klänningar och hattar (och en nalle). /
Each doll came with a collection of dresses and hats (and a teddy bear).

And their own cozy beds – with a mattress, a pillow and a blanket. Needless to say, the girls love their new dolls!

The patterns for the doll and clothing are located here and on the left sidebar (Visto en http://byhookbyhand.blogspot.com.es/2009/11/good-thing-come-in-small-packages.html):
Doll pattern: http://sites.google.com/site/designbybethann/home/links/FreeSpiritMiniDoll.pdf?attredirects=0&d=1
Nightgown: http://sites.google.com/site/designbybethann/home/links/FSMiniNightgown.pdf?attredirects=0&d=1
Underwear: http://sites.google.com/site/designbybethann/home/links/FSMiniPantaloons.pdf?attredirects=0&d=1
Dress and Sunsuit: http://sites.google.com/site/designbybethann/home/links/FSMiniSideToSideBodiceDress%26SunSuit.pdf?attredirects=0&d=1
Mohair Sweater: http://sites.google.com/site/designbybethann/home/links/FSMiniMohairSweater.pdf?attredirects=0&d=1
Below is Carina, in the dark braids, and Jenny, with the curly red hair. Carina is wearing a dress from the pattern that comes with the Cindy doll; made without any alterations :-) The Mini Free Spirit Doll pattern includes instructions for both hair styles below, plus several others that are very easy.

martes, 24 de abril de 2012
Globos de aire caliente
How to Make Flying Paper Lanterns

Suscribirse a:
Entradas (Atom)